Chocolate Lava Cake Recipe: The Art of the Molten Center
There is a particular kind of pleasure in breaking open something that looks composed and finding something molten underneath.
There is a particular kind of pleasure in breaking open something that looks composed and finding something molten underneath. I’ve been thinking about this lately — about the way the best desserts hold a secret. The chocolate lava cake, for all its reputation as a restaurant showpiece, is really just a study in restraint and timing. You are making something that looks finished but isn’t. You are trusting the heat to do exactly what it needs to do, and then you are pulling it back before it goes too far.
I came to this recipe honestly, if a little late. For years, I thought of molten chocolate cakes as the province of Valentine’s Day menus and places with white tablecloths — beautiful but not mine. Then one winter, Abram’s sister came for dinner and asked if I’d make something with chocolate. I had dark chocolate in the pantry, good butter, a carton of eggs, and about forty minutes. I made lava cakes almost by accident, and they came out exactly right, and everyone went quiet in the way that means something worked. I’ve made them many times since. They are now, quietly, one of my favorite things to bring to a table.
What I love most about this recipe is its economy. Six ingredients. Twelve minutes in the oven. The whole operation takes less than half an hour, and yet the result has a formality to it — a small dark cake, dusted with cocoa, splitting open at the first touch of a spoon to release something warm and barely-set and deeply, seriously chocolate. It is, I think, one of the better things I’ve made. The secret, as with most things that appear effortless, is paying attention at the right moment.
A note on chocolate: this is not the place for anything less than seventy percent cacao. The center will be liquid, which means its flavor will be untempered, direct, almost sharp. You want chocolate with character — something with a little bitterness to balance the butter and sugar. I use a French dark chocolate, though an excellent Ethiopian single-origin would be extraordinary here, if you can find one. The terroir of the chocolate matters in a way it rarely does in baking. Use something you’d be happy eating on its own. The cake will tell the difference.
Ingredients
- 170g dark chocolate (70% cacao or higher), roughly chopped
- 115g unsalted butter, plus extra softened butter for greasing
- 2 large eggs, at room temperature
- 2 large egg yolks, at room temperature
- 60g powdered sugar, sifted
- 2 tbsp all-purpose flour
- 1 pinch fine sea salt
- Cocoa powder, for dusting the ramekins
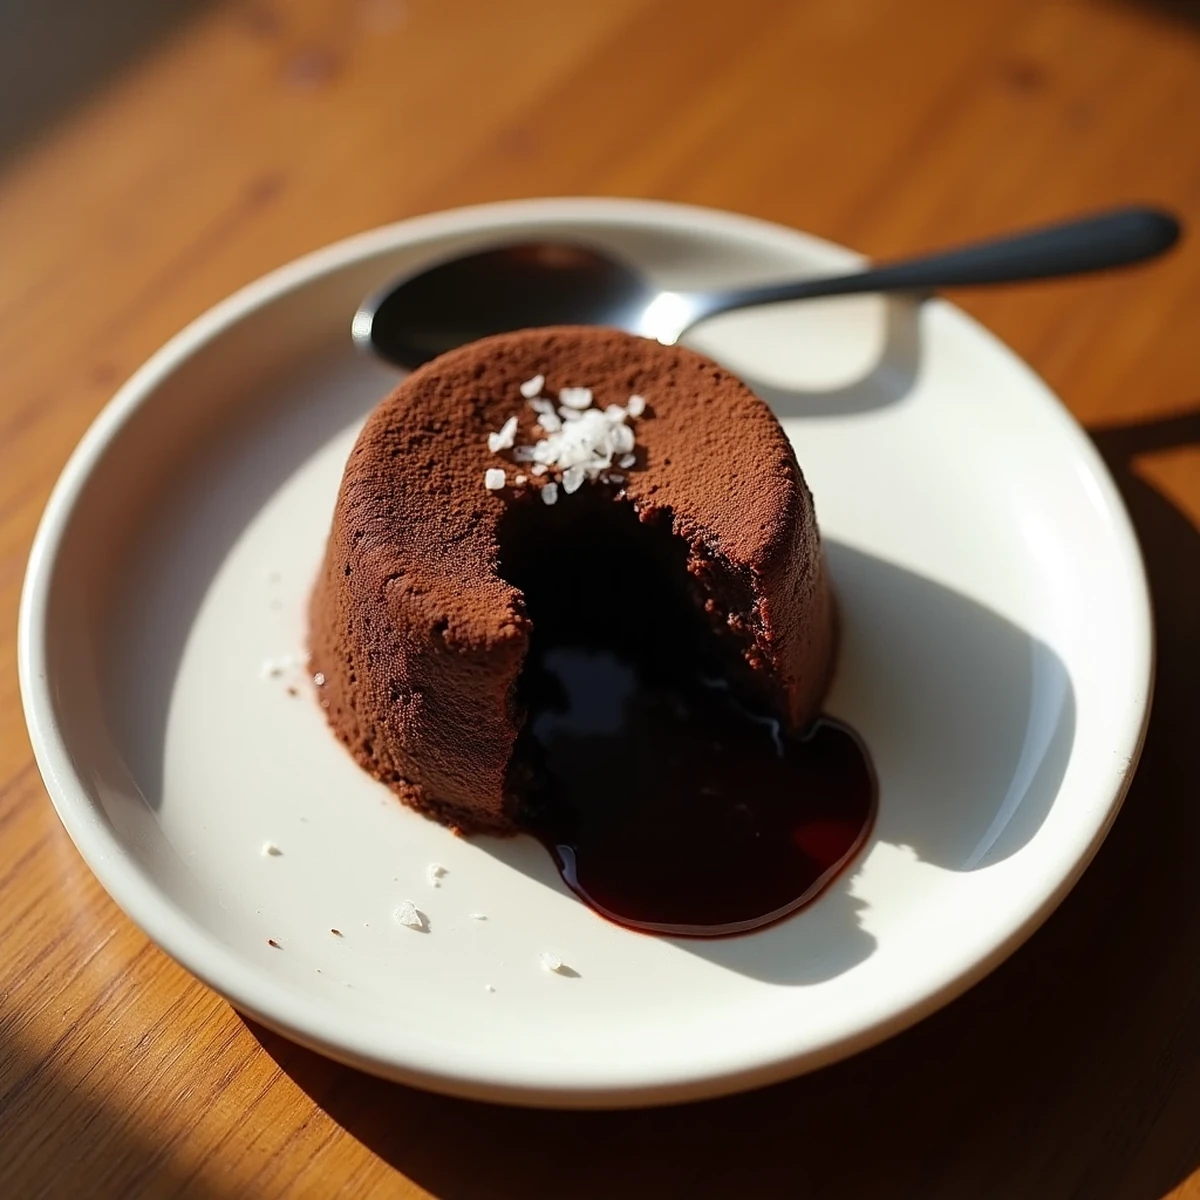
- Flaky sea salt, for finishing (optional but recommended)
- Vanilla ice cream or crème fraîche, to serve
Instructions
-
- Preheat your oven to 220°C (425°F). Generously butter four 6-ounce ramekins, then dust each one with cocoa powder, tapping out any excess. The cocoa creates a surface that releases cleanly — do not skip this step. Set the ramekins on a small baking sheet and set aside.
-
- Combine the chopped chocolate and butter in a heatproof bowl set over a pot of barely simmering water. Stir gently and steadily until both are fully melted and the mixture is glossy and smooth. Remove from heat and set aside to cool slightly — about 5 minutes. You want it warm, not hot, when it meets the eggs.
-
- In a separate bowl, whisk together the eggs, egg yolks, and sifted powdered sugar until the mixture is pale, slightly thickened, and holds a ribbon when you lift the whisk. This takes about 2 minutes by hand. The aeration here is what gives the cake its structure — take your time.
-
- Pour the warm chocolate mixture into the egg mixture, folding gently with a spatula until just combined. Add the flour and salt, and fold again until no streaks of flour remain. The batter will be dense and dark and beautiful. Do not overmix.
-
- Divide the batter evenly among the prepared ramekins, filling each about three-quarters full. At this point, the ramekins can be covered and refrigerated for up to 24 hours. If baking from cold, add 1-2 minutes to the cook time.
-
- Bake for 11 to 12 minutes, until the edges are set and the tops look matte and slightly cracked, but the center still moves gently when you nudge the baking sheet. This is the critical moment. Eleven minutes gives you a very liquid center; twelve gives you something slightly more set but still molten. Know which you want before you open the oven.
-
- Remove from the oven and let the cakes rest in their ramekins for exactly 1 minute — no more. Run a thin knife carefully around the inside edge of each ramekin, then place a small plate over the top, invert firmly, and lift the ramekin away. The cake should release cleanly onto the plate.
-
- Finish with a small pinch of flaky sea salt over the top. Serve immediately, with a spoonful of crème fraîche or a scoop of vanilla ice cream alongside. The window between perfect and overdone is brief — bring these to the table at once.
Nutrition
Tips
1. Bring your eggs to room temperature before you begin. Cold eggs do not incorporate smoothly into warm chocolate, and the batter’s texture will suffer for it. Twenty minutes on the counter is enough. This is a small thing that makes a noticeable difference — and in a recipe with so few ingredients, every variable counts.
2. Learn your oven for this recipe. Twelve minutes is the right time in my oven. In yours, it may be eleven, or thirteen. The first time you make these, bake one ramekin as a test before committing to the full batch. Cut into it. Assess the center. Adjust from there. Once you know your oven’s number, this recipe becomes effortless.
3. The batter keeps beautifully in the refrigerator. This is, quietly, the recipe’s great gift — you can prepare it entirely the day before a dinner party, keep the filled ramekins covered in the cold, and slide them into the oven twelve minutes before you want to serve dessert. No stress, no last-minute work. The result is the same. This is what I do every time I make these for guests, and no one has ever suspected the deception.